Partition Magic - Partition Manager Software
Extend partition with one step
Resize/Move partition without data loss.
Create, delete and format partion with simple steps. Copy partition and disk to transfer data with ease. Support disk and partition size larger than 2 TB. Keep your data safe even in case of power outages or hardware failure.
Resize/Move partition without data loss.
Create, delete and format partion with simple steps. Copy partition and disk to transfer data with ease. Support disk and partition size larger than 2 TB. Keep your data safe even in case of power outages or hardware failure.

Recovery Scenarios
- Restoring from a Local Partition
To restore a hard disk/partition from the backup image Backup Image is an archive of the disk, which includes all the on-disk files and service information on the disk layout. To restore disks from such an archive means retrieving all informational components of the disk (e.g. a hard disk image consists of its partitions, the Partition Table and even bootstrap code). situated on a local mounted (drive letter assigned) partition, simply do the following:
WinPE Recovery CD
1. Insert Paragon WinPE Recovery CD (the BIOS must be enabled to boot the system from the CD/DVD device).
2. Restart the computer.
3. Launch the Restore Wizard by clicking the Backup and Rescue button of the Express Launcher and then selecting the Simple Restore item.
4. On the Restore Wizard's Welcome page, click the Next button.
5. On the Browse for Archive page, select the required archive in the browser-like window. The Archive File Details section displays a short description of the selected image. Click the Next button.
6. The What to Restore page displays detailed information about the contents of the archive. It includes a full description of properties about the archived disks or partitions. In case you have a complex archive, select the required item to restore.
7. On the Where to Restore page select a place you would like to restore the archive to.
8. On the Restore Results page review all parameters of the operation and modify them if necessary. Click the Next button to start the restore process.
9. After completing the operation reboot the computer.
Linux/DOS Recovery CD
1. Insert Paragon Linux/DOS Recovery CD (the BIOS must be enabled to boot the system from the CD/DVD device).
2. Restart the computer.
3. Set up a network connection by selecting the Network Configurator item of the main menu.
4. Launch the Simple Restore Wizard. Click the Next button on the Welcome page.
5. On the What to Restore page, either type the full path to the backup image of the disk, which you are going to restore, or click the standard browse button [...] to find it. Click the Next button.
6. On the Image Properties page, make sure that you select the correct image viewing the provided information about the archive. When the archive has been chosen, click the Next button.
7. On the disk layout map, select a disk, to be restored. Click the Next button.
8. Set the size of the partition. The user can compress or expand it at the expense of available unused space. Click the Next button.
9. Click the Finish button to initiate the restoring process.
10. After completing the operation reboot the computer.
Restoring from a Network Drive
To restore a hard disk/partition from the backup image located on a network drive, simply do the following:
WinPE Recovery CD
1. Insert Paragon WinPE Recovery CD (the BIOS must be enabled to boot the system from the CD/DVD device).
2. Restart the computer.
3. Launch the Restore Wizard by clicking the Backup and Rescue button of the Express Launcher and then selecting the Simple Restore item.
4. On the Restore Wizard's Welcome page, click the Next button.
5. On the Browse for Archive page, select the required archive in the browser-like window. The Archive File Details section displays a short description of the selected image. Click the Next button.
6. The What to Restore page displays detailed information about the contents of the archive. It includes a full description of properties about the archived disks or partitions. In case you have a complex archive, select the required item to restore.
7. On the Where to Restore page select a place you would like to restore the archive to.
8. On the Restore Results page review all parameters of the operation and modify them if necessary. Click the Next button to start the restore process.
9. After completing the operation reboot the computer.
Linux/DOS Recovery CD
1. Insert Paragon Linux/DOS Recovery CD (the BIOS must be enabled to boot the system from the CD/DVD device).
2. Restart the computer.
3. Set up a network connection by selecting the Network Configurator item of the main menu.
4. Launch the Simple Restore Wizard. Click the Next button on the Welcome page.
5. On the What to Restore page, either type the full path to the backup image of the disk, which you are going to restore, or click the standard browse button [...] to find it. Click the Next button.
6. On the Image Properties page, make sure that you select the correct image viewing the provided information about the archive. When the archive has been chosen, click the Next button.
7. On the disk layout map, select a disk, to be restored. Click the Next button.
8. Set the size of the partition. The user can compress or expand it at the expense of available unused space. Click the Next button.
9. Click the Finish button to initiate the restoring process.
10. After completing the operation reboot the computer.
Restoring Separate Files and Folders from a Backup
To restore separate files and folders from backup images with the Volume Explorer, simply do the following:
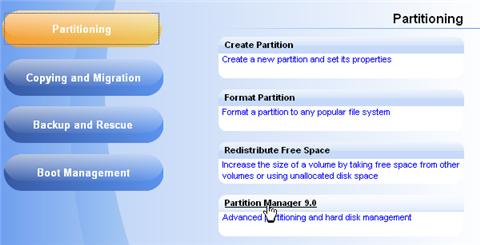
1. Launch Partition Manager 11 by clicking the Partitioning button and then selecting Partition Manager 11 in the Express Launcher;
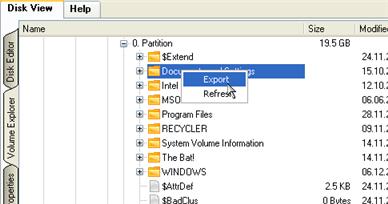
2. In the main window of PM, click the Disk View tab and then choose Volume Explorer;

3. Browse for the required archive and then open it by double click of the left mouse button.

4. Call the popup menu (right click of the mouse button) for a file/folder you need and then select the Export item.
5.Select a place on the disk where the file/folder will be extracted to.
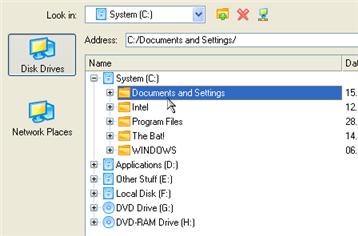
6. Click the OK button to accomplish the operation.
Copying of data from the corrupted system disk to another hard disk
To retrieve valuable information from your hard disk and copy it to another hard disk when the system fails to boot, simply do the following:
1. Connect the second hard disk to the computer.
2. Insert Paragon WinPE or Linux/DOS Recovery CD (the BIOS must be enabled to boot the system from the CD/DVD device).
3. Restart the computer.
4. Launch the File Transfer Wizard. Click the Next button to continue.
 You can start up the File Transfer Wizard in the WinPE version of the program just the way it is done in Windows. However when dealing with the Linux/DOS Recovery CD, you can do it from the main menu.
5. Select a disk where the files you need are stored from the pull-down list in the right pane of the page.
6. Choose files you want to copy and place them to Clipboard by pressing the left arrow-button.
7. Choose the way the data will be stored. Select the Save data to local drives or physical partitions item. Click the Next button to continue.
8. On the Select Destination Path page, select a hard disk to copy the data to by pressing the Browse button. Click the Next button to accomplish the operation.
9. After the operation is completed, exit the wizard by pressing the appropriate button.
10. Eject the CD.
11. Turn off the computer.
File Transfer Wizard is not available for the Personal version of the program. To know more on the subject, please consult the Partition Manager Editions chapter.
Burning of data from the corrupted system disk to CD/DVD
To retrieve valuable information from your hard disk and burn it to CD/DVD when the system fails to boot, simply do the following:
1. Insert Paragon WinPE or Linux/DOS Recovery CD (the BIOS must be enabled to boot the system from the CD/DVD device).
2. Restart the computer.
3. Launch the File Transfer Wizard. Click the Next button to continue.
You can start up the File Transfer Wizard in the WinPE version of the program just the way it is done in Windows. However when dealing with the Linux/DOS Recovery CD, you can do it from the main menu.
4. Select a disk where the files you need are stored from the pull-down list in the right pane of the page.
5. Choose files you want to copy and place them to Clipboard by pressing the left arrow-button.
6. Estimate the resulted data size by pressing the Calc button. Click the Next button to continue.
7. Choose the way the data will be stored. Select the Burn data to CD/DVD item. Click the Next button to continue.
8. On the Choose a recorder page, select a recorder from the list and then set a volume label by typing it in the appropriate field. Click the Next button to continue.
The program enables to burn data either to a CD/DVD or an ISO image.
9. Insert a blank CD/DVD. In case the inserted disc is not empty, the program suggests the user erasing its contents. Click the Next button to accomplish the operation.
10. After the operation is completed, exit the wizard by pressing the appropriate button.
11. Eject the CD.
12. Turn off the computer.
File Transfer Wizard is not available for the Personal version of the program. To know more on the subject, please consult the Partition Manager Editions chapter.
Copying of data from a backup to the corrupted system partition
The system fails to boot since some files are damaged. If you have a backup of the system partition, you can recopy these files to make the system be operable again:
1. Insert Paragon WinPE or Linux/DOS Recovery CD (the BIOS must be enabled to boot the system from the CD/DVD device).
2. Restart the computer.
3. Launch the File Transfer Wizard. Click the Next button to continue.
You can start up the File Transfer Wizard in the WinPE version of the program just the way it is done in Windows. However when dealing with the Linux/DOS Recovery CD, you can do it from the main menu.
4. Select a disk where the system backup is stored from the pull-down list in the right pane of the page.
5. Open the required backup, choose files you want to copy and place them to Clipboard by pressing the left arrow-button.
6. Choose the way the data will be stored. Select the Save data to local drives or physical partitions item. Click the Next button to continue.
7. On the Select Destination Path page, select the required system disk to copy the data to by pressing the Browse button. Click the Next button to accomplish the operation.
8. After the operation is completed, exit the wizard by pressing the appropriate button.
9. Eject the CD.
10.Turn off the computer.
File Transfer Wizard is not available for the Personal version of the program. To know more on the subject, please consult the Partition Manager Editions chapter.