Partition Magic - Partition Manager Software
Extend partition with one step
Resize/Move partition without data loss.
Create, delete and format partion with simple steps. Copy partition and disk to transfer data with ease. Support disk and partition size larger than 2 TB. Keep your data safe even in case of power outages or hardware failure.
Resize/Move partition without data loss.
Create, delete and format partion with simple steps. Copy partition and disk to transfer data with ease. Support disk and partition size larger than 2 TB. Keep your data safe even in case of power outages or hardware failure.

Creating Dual Boot Systems
- Release of Windows Vista has given a new impetus to the problem of establishing a dual boot system. In this connection we decided to consider two the most frequently used situations a rank and file user may face, i.e. Windows Vista + Windows XP and Windows XP + Windows Vista. Please note that for reasons of better security and system independence these operating systems will be installed on different partitions. That is why we need to hide the first system partition before installation of the second OS.
Windows Vista + Windows XP
Suppose you have got Windows Vista coming with your brand new computer. Everything is great except one thing - your favourite applications simply reject to work correctly on it. Software updates are expected to release in the near future, but you cannot wait any more. Thus the best way out is to leave Windows Vista intact and install the time-proved Windows XP.
Most likely you have only one hard disk with only one partition (the only partition is always system). To install the second operating system you need to repartition your drive first, as it requires a separate primary partition. If this case, the following scenario is just what you need:
 This scenario implies that operating systems will be installed on different partitions to provide better security and system independence.
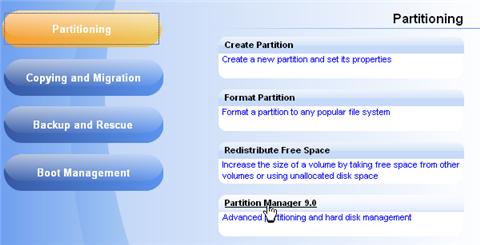
1. Launch Partition Manager 11 by clicking the Partitioning button and then selecting Partition Manager 11 in the Express Launcher;
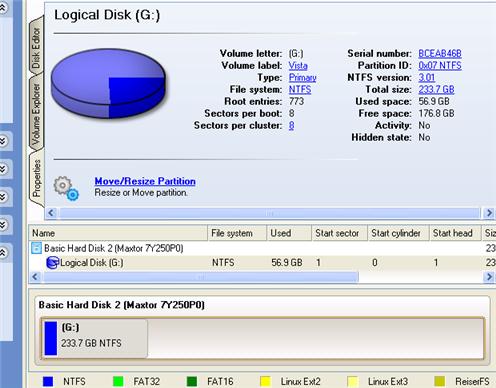
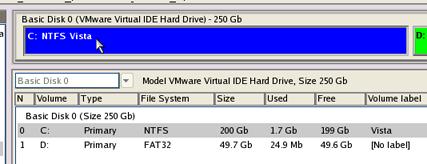
2. In the main window of PM select your hard disk on the Disk Map to make a block of free space on it;
3. Release some free space (not less than 10 GB to install Windows XP) from the partition. To do that, please call the context menu for the selected partition (right click of the mouse button) and launch the Move/Resize dialog;
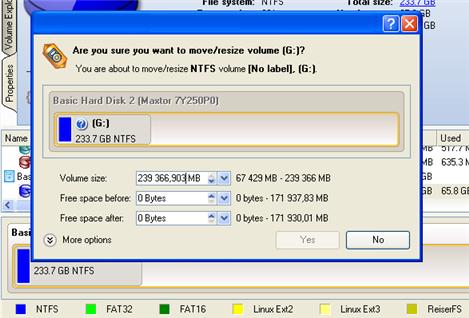
4. In the opened dialog shift the edge of the partition to the left by the drag-and-drop technique. While doing this, free space from the partition will be released (displayed in aqua-green). You can also do it manually by entering the exact size of free space. Click the Yes button to continue;

The Move/Resize dialog offers a number of additional parameters that can also be of help. However here we pay attention to the most relevant to fulfill our task.
5. Now the user has a block of free space sufficient in size to hold a new partition;

6. Create a new partition to install Windows XP. To do that, please call the context menu for a newly created block of free space (right click of the mouse button) and launch the Create Partition dialog;
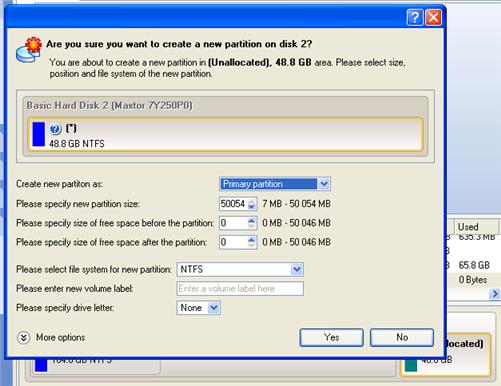
7. Define parameters of the future partition. By all means it has to be primary and since we are going to install Windows XP, the most preferable file systems are NTFS and FAT32. Click the Yes button to continue;
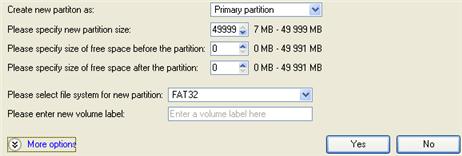
The Create Partition dialog offers a number of additional parameters that can also be of help. However here we pay attention to the most relevant to fulfill our task.
8. As a result of the operation we have got a newly created FAT32 partition just enough in size to comfortably work with Windows XP;

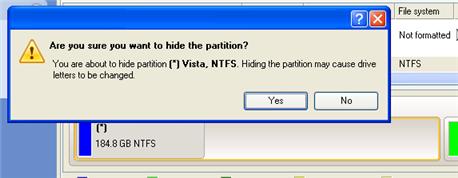
9. Hide the Windows Vista partition to avoid writing any data on it during the Windows XP installation, as it is the best way to provide system independence. To do that, please call the context menu for it (right click of the mouse button) and launch the Hide Partition dialog. Click the Yes button to continue;
Hiding of the system partition will make OS non-bootable, what is quite normal.
10. Apply all introduced changes. By default, PM works in the virtual mode of execution, so you have to confirm all operations to let the program accomplish them. To do that, just click the Apply button on the Virtual Operations Bar;
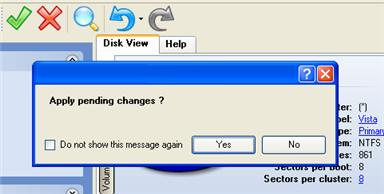
To perform the pending operations the program will need to restart the system into a special mode of execution.
After all the operations are completed you will not be able to restart the system, what is quite normal. Nevertheless if you do try it, the following error will occur:
All the mentioned above operations can be accomplished with the help of the Linux/DOS Recovery CD.
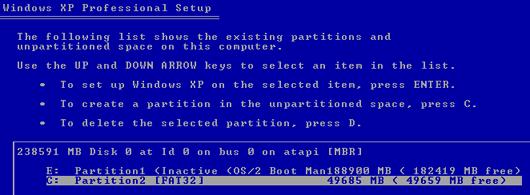
11. Install Windows XP on the newly created partition. We won't go into details as for its installation, as you can find all the necessary information in documentation that comes with the product. However to avoid any problems, we consider it necessary to draw your attention on the following issues:
- You need a bootable distributive CD of Windows XP to install it;
- To automatically start your computer from this CD, make sure the on-board BIOS is set up to boot from CD first or press F12 during startup to select a bootable device;
- Do not forget to select the newly created partition as destination.
Installation of Windows XP will make Windows Vista non-bootable.
12. Launch the Boot Manager Setup wizard. As your Windows Vista is non-bootable any more, you need to install Partition Manager 11 once again, but this time in Windows XP to activate Boot Manager.
To avoid double installation of the program, you can use WinPE Recovery CD to activate Boot Manager.
13. To launch the Boot Manager Setup wizard, please click the Boot Management button of the Express Launcher and select Boot Manager;
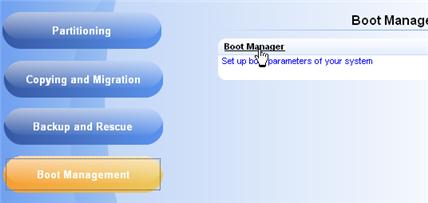
14. Set up the Boot Manager wizard. The most relevant option here is the possibility to hide other primary partitions except the one selected to boot and it is by all means should be activated to make Windows Vista and Windows XP unaware of each other. The rest of the parameters offered by default will do in our case, so just complete the wizard and it will automatically find the two operating systems and update the MBR.

15. Now restart the computer to make sure you have got a dual boot system.
Windows XP + Windows Vista
If you've got Windows XP and are willing to try the latest Windows Vista but not sure your favorite applications will flawlessly work on it, the best way out is to leave the time-proved Windows XP intact and install Windows Vista for studying purposes.
As this very situation is very close to the previous one, please use the Windows Vista + Windows XP scenario but taking into consideration a number of peculiarities:
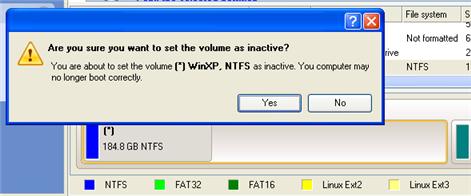
1. Besides hiding of the system partition before installation of the second OS you need to make it inactive as well. To do that, please call the context menu for it (right click of the mouse button) and launch the corresponding dialog. Click the Yes button to continue;
Reviving the System Partition
In case you are not able or not willing to complete the mentioned above scenarios, but have already reached the point when all changes are applied and everything is ready to install the second OS, simply do the following to make your system bootable once again:
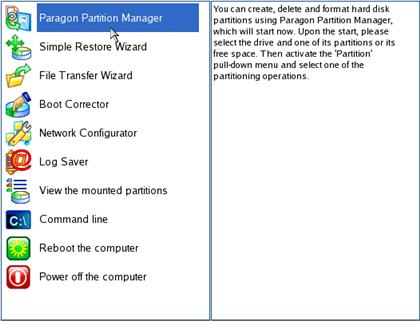
1. Insert Paragon Linux/DOS Recovery CD (the BIOS must be enabled to boot the system from the CD/DVD device).
2. Restart the computer.
3. Select the Paragon Partition Manager item of the main menu.
4. In the main window of PM select your non-bootable Windows partition on the Disk Map;
5. Unhide the partition by calling the context menu for it (right click of the mouse button) and then selecting Unhide;
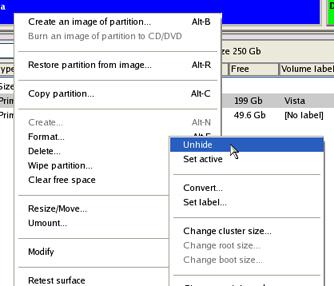
6. Only for the Windows XP + Windows Vista scenario you need to make the system partition active as well by calling the context menu for it (right click of the mouse button) and then selecting Set Active;
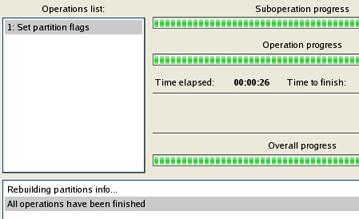
7. You will be notified after the operations are completed.
8. Restart the computer.
As a result your Windows becomes bootable once again.